
Ever pulled the trigger on your airbrush expecting a silky-smooth coat, only to end up with ugly paint splatters, dry spray, or pooling droplets? You diluted the paint properly, cleaned the needle, and yet your model kit looks like an orange peel.
It’s not just bad luck—it’s a violation of fluid dynamics. The good news? You don’t need a degree in aerospace engineering to fix it. You just need to master the balance between air speed, fluid viscosity, and PSI.
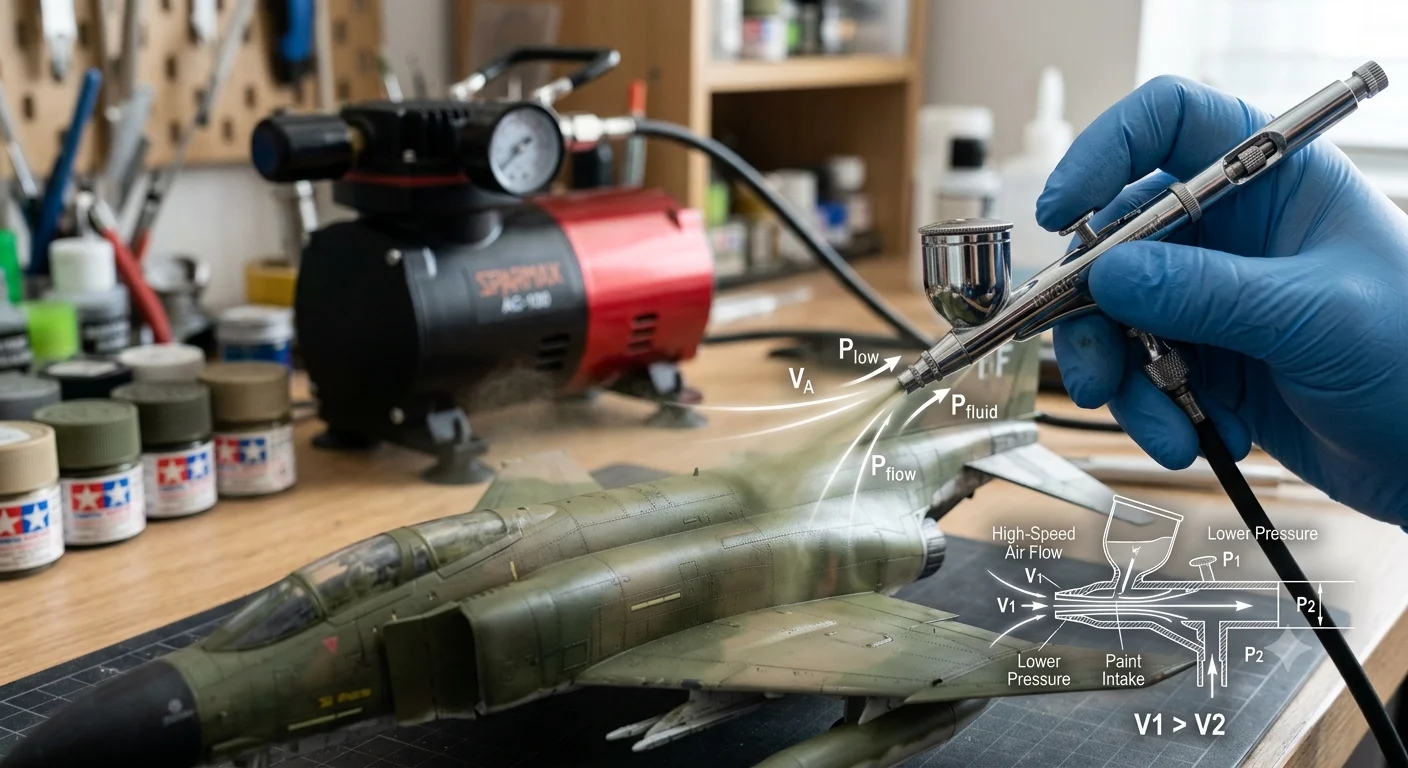
The Physics Behind It: How Bernoulli’s Principle Atomizes Your Paint
At the heart of every airbrush lies Bernoulli’s Principle. Simply put: as the speed of a fluid (or air) increases, its internal pressure decreases.
Here is what happens inside your airbrush nozzle:
- High-Velocity Airflow: Compressed air forces its way through a narrow nozzle, accelerating drastically right at the tip.
- Localized Low-Pressure Zone: This sudden burst of high-speed air creates a micro-vacuum (negative pressure) right in front of the fluid tip.
- Liquid Atomization: This pressure drop literally sucks the thinned liquid paint up out of the cup and shatters it into a microscopic mist of fine droplets.
       [ Air Stream (High Velocity) ]
                   |
     === NOZZLE TIP ===> [ Low Pressure Zone ] <--- Sucks Paint Up!
                   |
      [ Paint Cup (Atmospheric Pressure) ]
When your airbrush splatters or orange-peels, the culprit is almost always improper atomization. If your PSI (Pounds per Square Inch) is too low, the airflow lacks the speed required to create a strong enough vacuum, causing liquid paint to leave the tip in massive, uneven droplets. Conversely, if your PSI is too high, the air velocity tears the paint apart so aggressively that it dries in mid-air before hitting your surface, creating a chalky texture.
Interactive Tool Placeholder
Airbrush Optimizer
PSI Pressure & Dilution Ratio Simulator
Step-by-Step Troubleshooting: Dialing in Your Optimal Setup
To stop fighting your equipment and start getting glass-smooth layers, follow this 3-step tuning framework.
1. Match Your PSI to Paint Viscosity and Nozzle Size
Different paints require different kinetic energy to break apart cleanly. Use this cheat sheet as your baseline setup:
| Paint Type | Nozzle Diameter | Recommended PSI Range | Thinning Ratio (Paint : Thinner) |
| Acrylics (Water-based) | 0.3 mm – 0.5 mm | 18 – 25 PSI | 1 : 1 to 1 : 2 (Milk consistency) |
| Lacquers (Solvent-based) | 0.2 mm – 0.3 mm | 12 – 18 PSI | 1 : 1.5 to 1 : 2 (Skim milk consistency) |
| Enamels | 0.3 mm | 15 – 20 PSI | 1 : 1 |
| Primers / Metallic Paints | 0.35 mm – 0.5 mm | 22 – 30 PSI | 1 : 0.5 to 1 : 1 |
2. Apply the "Skim Milk Test"
Never rely purely on factory PSI recommendations without checking paint thickness.
- Mix your paint and thinner in a separate cup.
- Swirl it against the side: it should run down cleanly, leaving a translucent film behind—identical to the behavior of skim milk.
- If it clings heavily to the walls, up your thinner ratio or boost your compressor pressure by 3–5 PSI.
3. Fine-Tune on Test Cardboard
Before bringing the airbrush to your high-value project, run this quick diagnostic pass:
- Symptom: Spider-Webbing / Running Paint $\rightarrow$ Cause: Pressure is too high or paint is too thin. Fix: Lower your PSI or pull back slightly from the surface.
- Symptom: Grainy, Dry Texture $\rightarrow$ Cause: Paint is drying in mid-air due to excess PSI or insufficient thinner. Fix: Lower PSI or add a retarder/thinner.
- Symptom: Large Droplets / Splatters $\rightarrow$ Cause: Low vacuum; air velocity is insufficient to shear the paint. Fix: Increase PSI or thin the paint further.
Investing in Precision: Why Your Compressor Matters
A high-end airbrush is only as good as the stability of the air driving it. Ultra-budget compressors lack air tanks, leading to constant pressure pulses that disrupt the low-pressure zone needed for consistent atomization. When upgrading your setup, prioritize dual-action airbrushes with micro-air-control (MAC) valves paired with a dedicated air tank compressor. Mastering fluid physics combined with precise pressure regulation is the single fastest way to transform your paint jobs from amateur to professional grade.
Master the fluid mechanics of creative DIY and modeling tools in [Gear & Logic: Applied Physics and Mathematics], or fine-tune your pressure ratios using [Interactive Tools: Live Science & Engineering Calculators].